

Foundation Damp Proofing & Drain Tile Code: Field-Ready Guide
Foundation damp proofing & drain tile are two of the most critical steps to passing your foundation inspection the first time.
If you skip key code details—or don’t know what inspectors actually look for—you’ll end up fixing it all over again. Here’s what you need to know to get it right and pass inspection with confidence.
If you’ve ever stood in a muddy new basement and wondered, “What exactly do I need to pass this foundation waterproofing and drain tile inspection?”—you’re not alone. Damp proofing and footing drains are classic “looks simple, but code’s in the details” steps that catch even good contractors and inspectors off guard. This post breaks it down—field-style, no filler—so you know what the AHJ is looking for, what actually meets IRC code, and how to spot trouble before the backfill covers your hard work.
1. Damp Proofing: What the IRC Requires
- Code Reference:
- IRC 2021 R406.1 – Concrete and Masonry Foundation Damp Proofing
- Plain English:
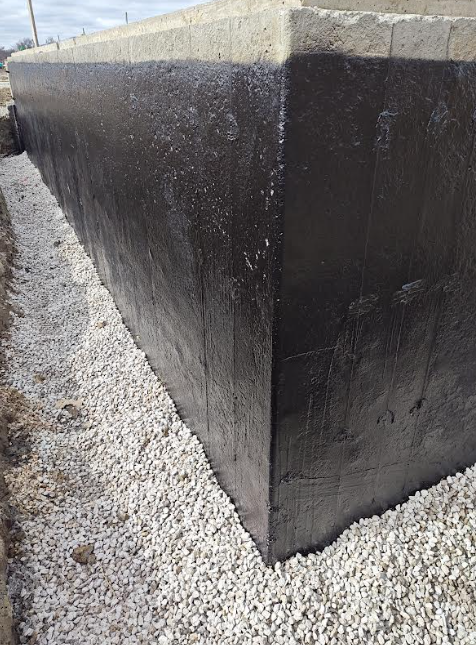
- Any foundation wall retaining earth and enclosing usable space below grade (think: basement walls) must be damp proofed on the exterior surface unless you’re required to fully waterproof (separate section—see R406.2 if groundwater is a known issue).
- What passes field inspection:
- Bituminous coating (most common: looks like black tar/asphalt emulsion sprayed/rolled on)
- Cement-based parging (sometimes with waterproofing admixture)
- Other code-listed products (roll-on membranes, certain sheet materials)
- Coverage: Damp proofing must extend from the top of the footing to finished grade. Miss that bottom edge? Fail.

Field tip: Inspectors want to see continuous coverage, no obvious bare spots, and the product labeled for dampproofing—not “paint.”
For more on foundation basics, see How to Read a Foundation Plan (Without Missing What Really Matters)
2. Footing Drain Tile: Drainage System Requirements
Before backfill, double-check your foundation damp proofing & drain tile details match code—and your AHJ’s local amendments.
- Code Reference:
- IRC 2021 R405.1 – Concrete or Masonry Foundations
- What the code actually requires:
- Drain tile (perforated pipe), gravel or crushed stone layer (minimum 6″ around pipe), or an approved drainage system.
- Pipe size: Minimum 4-inch diameter.
- Location: Drain tile must be installed at or below the area to be protected (bottom of the footing, outside edge is most common).
- Discharge: To a daylight location, approved sump, or other code-approved means.
- Filter: The pipe must be covered with an approved filter material (think: the mesh “sock” on perforated drain tile), or filter fabric/stone over.

Field tip: AHJs often look for the mesh sock (or clean filter fabric wrap) covering the entire perforated pipe. Pipe should be visible and not covered by stone until inspector walks. Washed stone must cover tile fully after approval.
3. Passing the Inspection: Field-Ready Checklist
- Wall is dry and free of loose debris before coating is applied
- Dampproofing is continuous—from top of footing to finished grade
- No obvious missed areas or thin/bare spots
- Product is labeled and approved for dampproofing (not paint)
- Inspector can visually confirm coverage before backfilling
- Drain Tile System:
- Perforated 4″ drain tile/pipe is laid flat at or just below footing level
- Pipe is continuous and unbroken around entire foundation perimeter (unless slab-on-grade or code allows otherwise)
- Mesh sock or approved filter material completely covers drain tile pipe
- Washed stone (minimum 6″ above and below) ready to be applied after inspection
- Pipe discharges to daylight, sump, or approved drain—not dead-ending in the dirt
- Pipe is visible and not covered until inspector walks
4. Common Fail Points (and How to Avoid Them)
- Skimping on dampproofing coverage—missing the footing-to-grade requirement
- Using unapproved coatings (e.g., exterior latex “because it looks black”)
- Drain tile with no mesh sock or filter—especially on sandy or silty sites
- Drain pipe crushed, out of slope, or not continuous at corners
- Stone backfill applied before the inspection
5. IRC Code and Reference Links
Final Pro Tip
Inspectors see a lot of rushed waterproofing jobs. Take a few extra minutes to check your dampproofing and drain tile install before you call for inspection—you’ll save yourself a muddy, time-consuming re-inspect every time.